When they need to share screenshots, order information, conversation records or personal information via iPhone, many people will immediately use the built-in markup tool of iOS to directly mark out the content with a black pen. However, in recent years, many actual test videos have begun to circulate on the Internet. Some people have successfully restored the originally obscured text content by adjusting the exposure, contrast, and brightness of the photos, or using AI retouching. Many users have begun to worry about privacy leaks. In fact, the iPhone’s built-in function itself provides a safer masking method, but many people usually don’t notice it. This article will sort out the latest iOS photo coding skills and teach you how to quickly add a mosaic mask to photos that cannot be easily cracked without using a third-party app, so as to avoid the restoration of personal information.
Why are iPhone photos mosaic or blackened, but the content can still be seen?
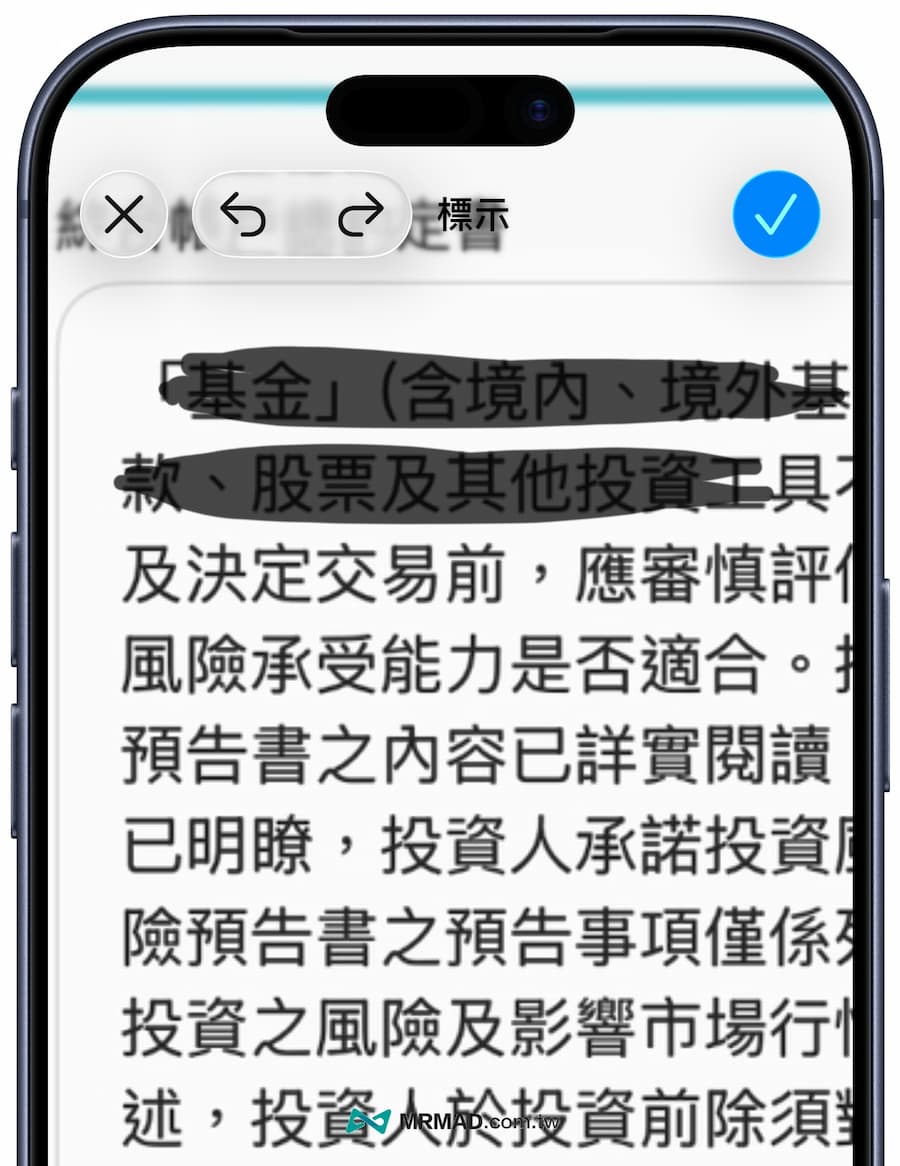
Many people mistakenly believe that using a black brush to cover the content or mosaic means complete occlusion, but in fact, most of the brushes and highlighters in the iPhone “logo” are semi-transparent layer effects.
Although it looks like complete black coverage to the naked eye, the underlying original pixels still exist. As long as you adjust the highlights, shadows and contrast with the retouching tools, you have the opportunity to re-see the outline of the original content.
Nowadays, the popularity of AI photo retouching has also led to many people using AI tools to automatically restore mosaics. It seems that the built-in photo mosaic function has been removed in iOS 26. If you also want to add mosaics to photos on your iPhone, you can do so through the following three methods, and avoid being cracked.
Method 1 to mosaic iPhone photos: Use built-in marking processing
Currently, the built-in “marking” tools in iOS are still mainly based on shapes, text, and brushes, and do not provide traditional pixelated mosaic or Gaussian blur functions. If more advanced blur processing is required, you usually still need the assistance of a third-party photo editing app.
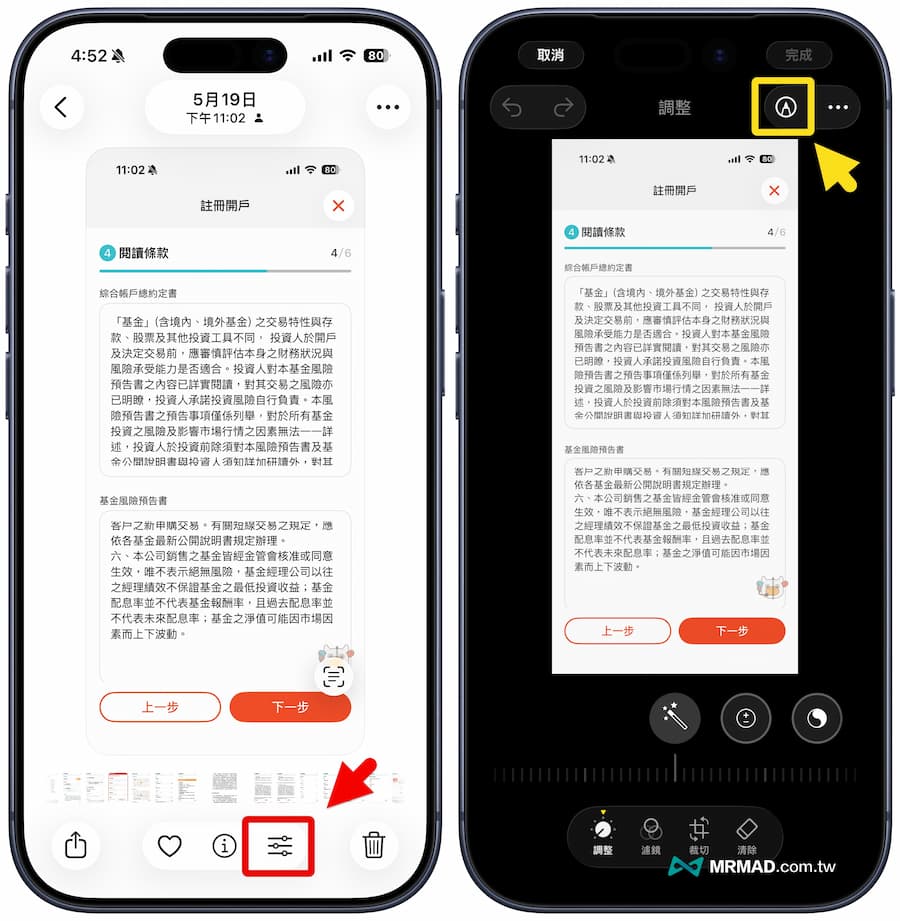
Step 1: Turn on photo editing
First enter the iPhone’s built-in Photos App, open the picture you want to block, click the “Edit” button on the lower toolbar, and then click “Mark” in the upper right corner to enter graffiti mode.
Step 2: Choose a masking color
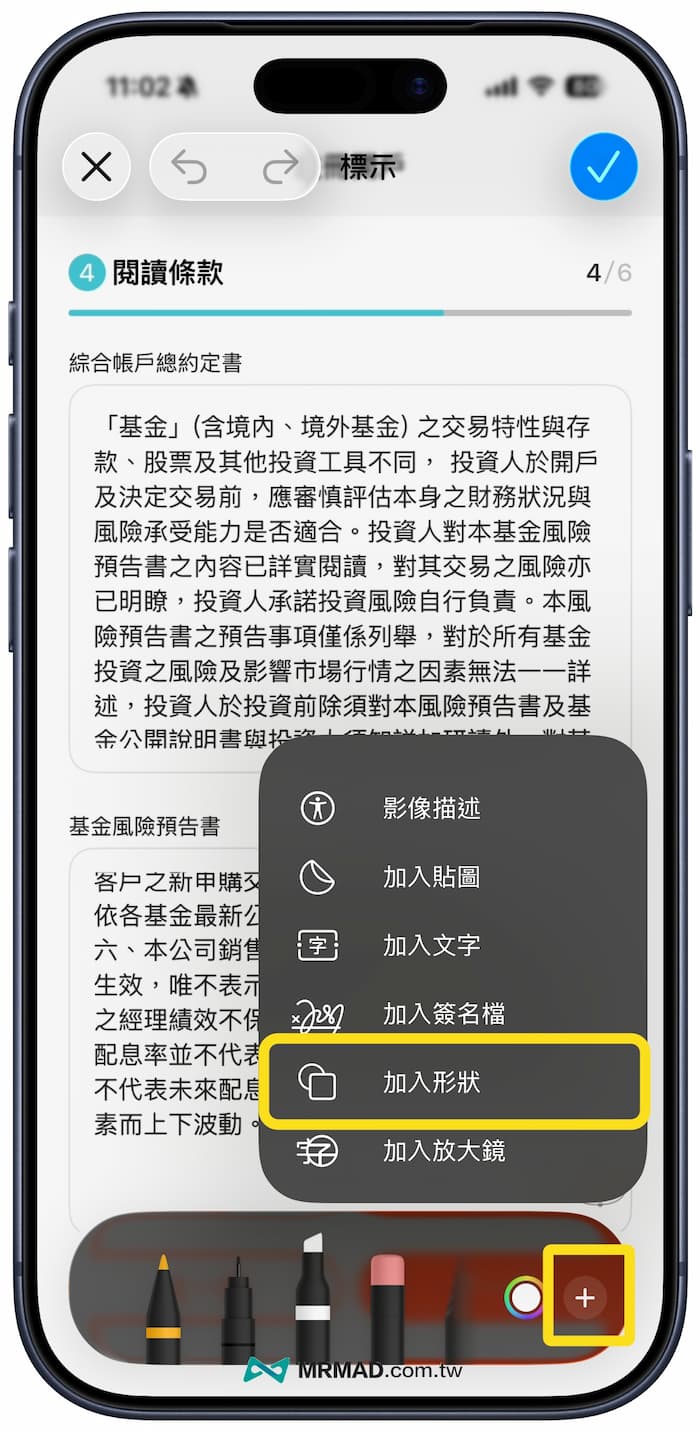
Click the “+” function key in the lower right corner, and then select “Add Shape”.
Step 3: Use a solid box instead
A variety of shape tools will appear. In the shape list, select the “solid box” style in the upper left corner.
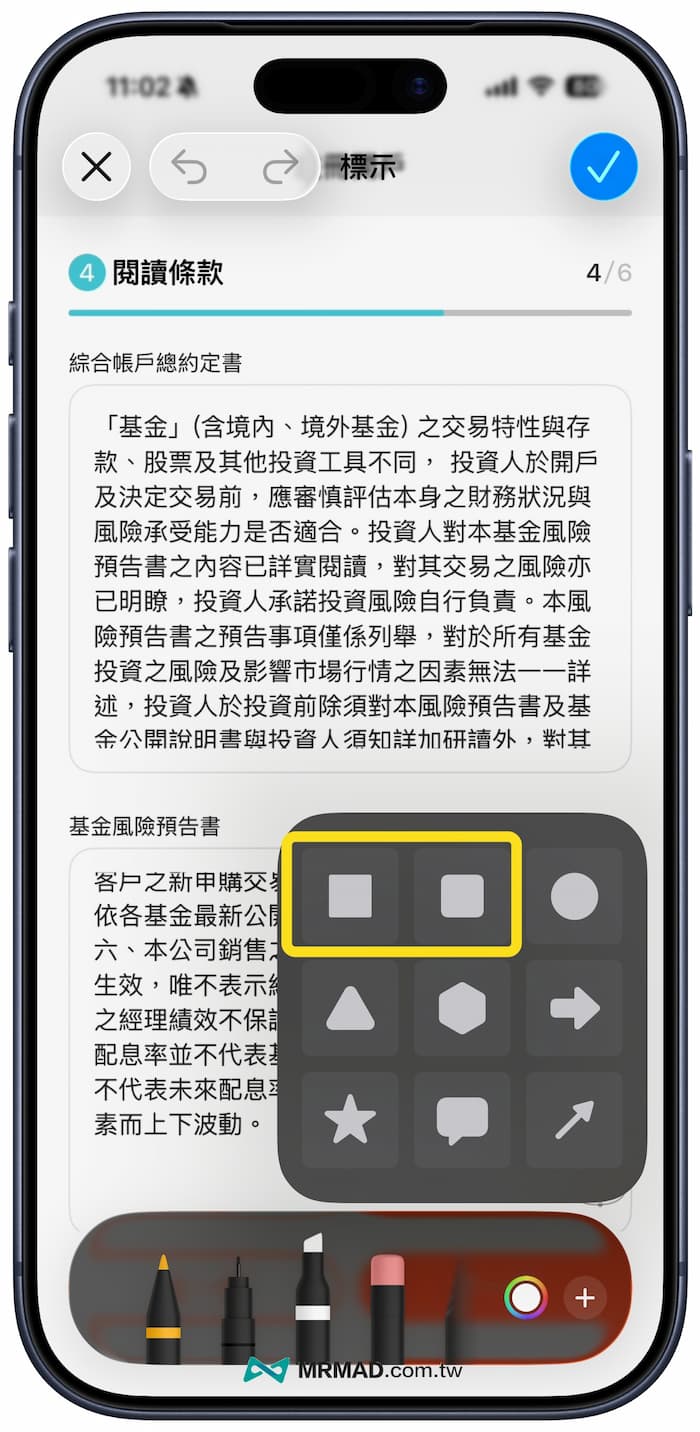
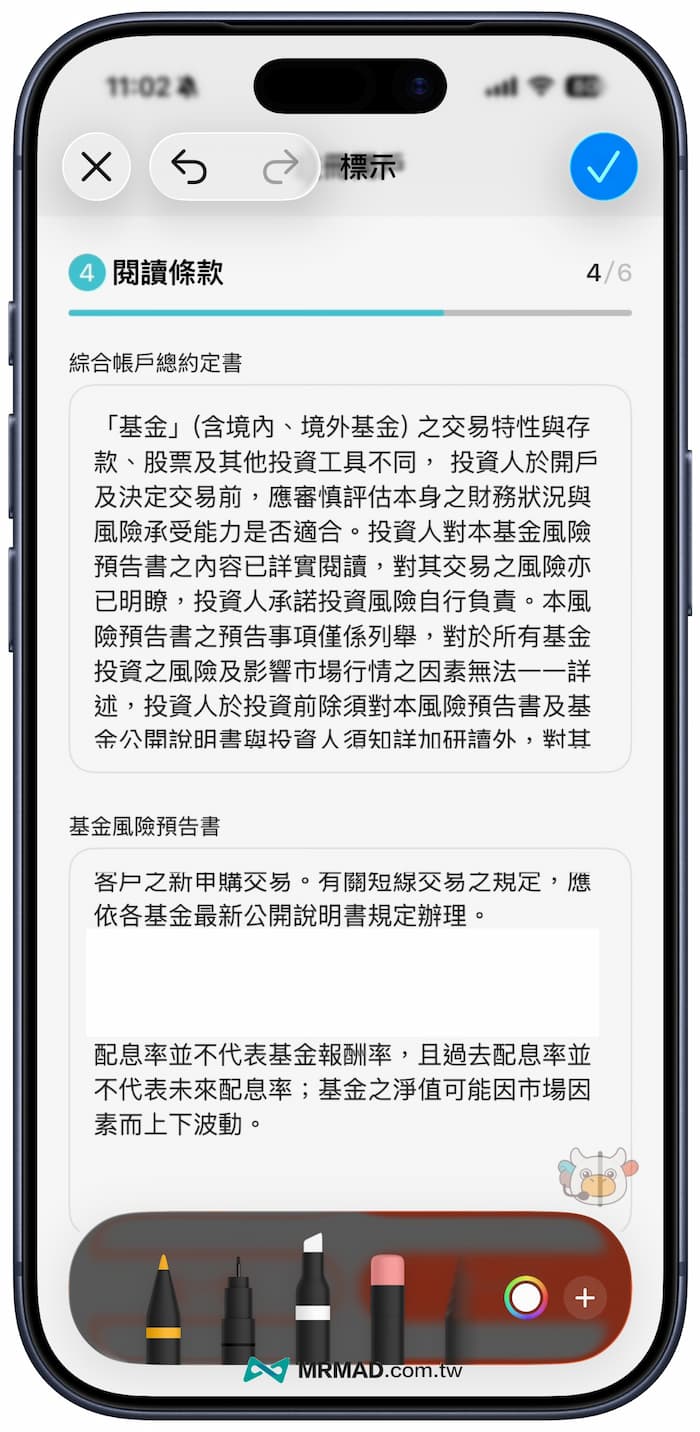
After adding it, you can directly drag and adjust the size and position to cover the information that needs to be hidden.
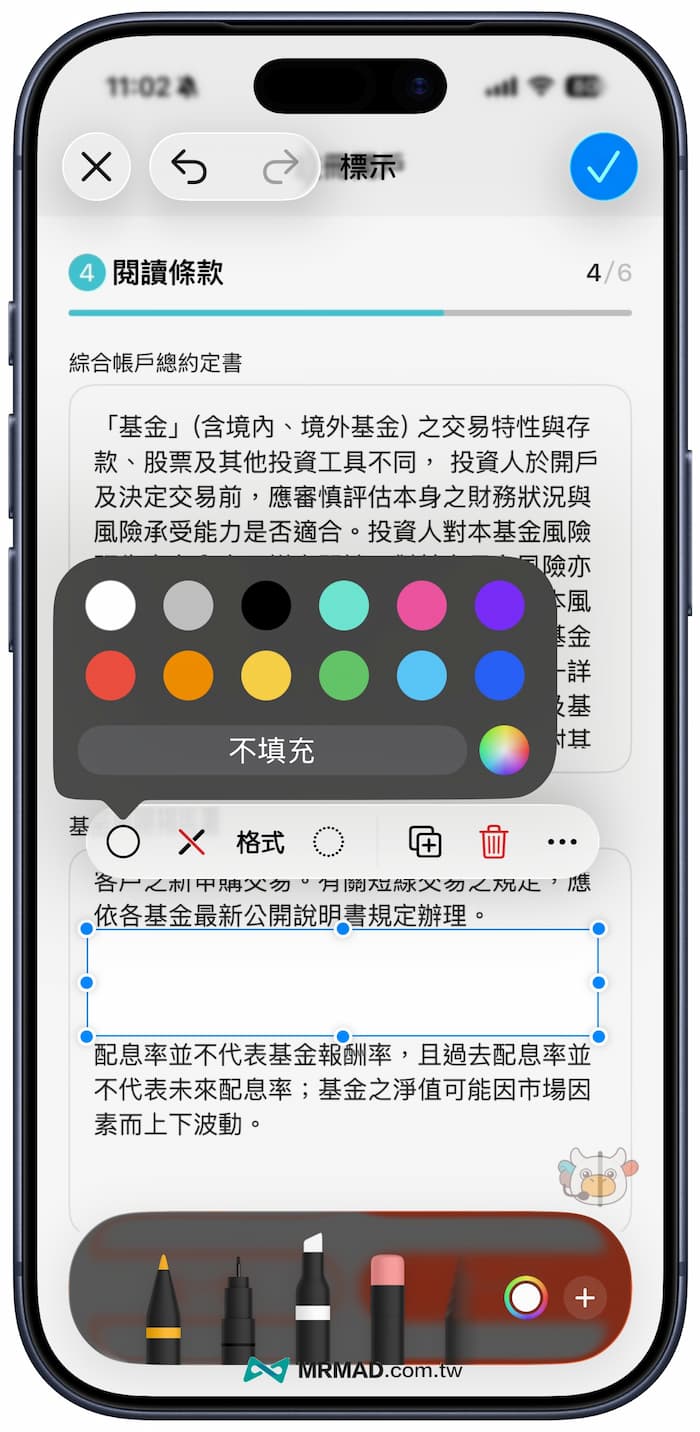
Step 4: Save the completed coding photo
After confirming that the mask position is correct, press to save. Whether you share delivery orders, online shopping screenshots, identity information or work documents in the future, you can effectively reduce the risk of information being restored.
Method 2 of mosaic iPhone photos: LINE built-in mosaic
If you want to use LINE to send photos or pictures to each other or drop a group, you can also use LINE’s built-in photo mosaic function, which is faster and more convenient. How to use your mobile phone to mosaic pictures or photos is as follows:
Step 1. Open the mobile version of “LINE App”, open the photo album function through the LINE chat room, and click on the photo you want to mosaic.
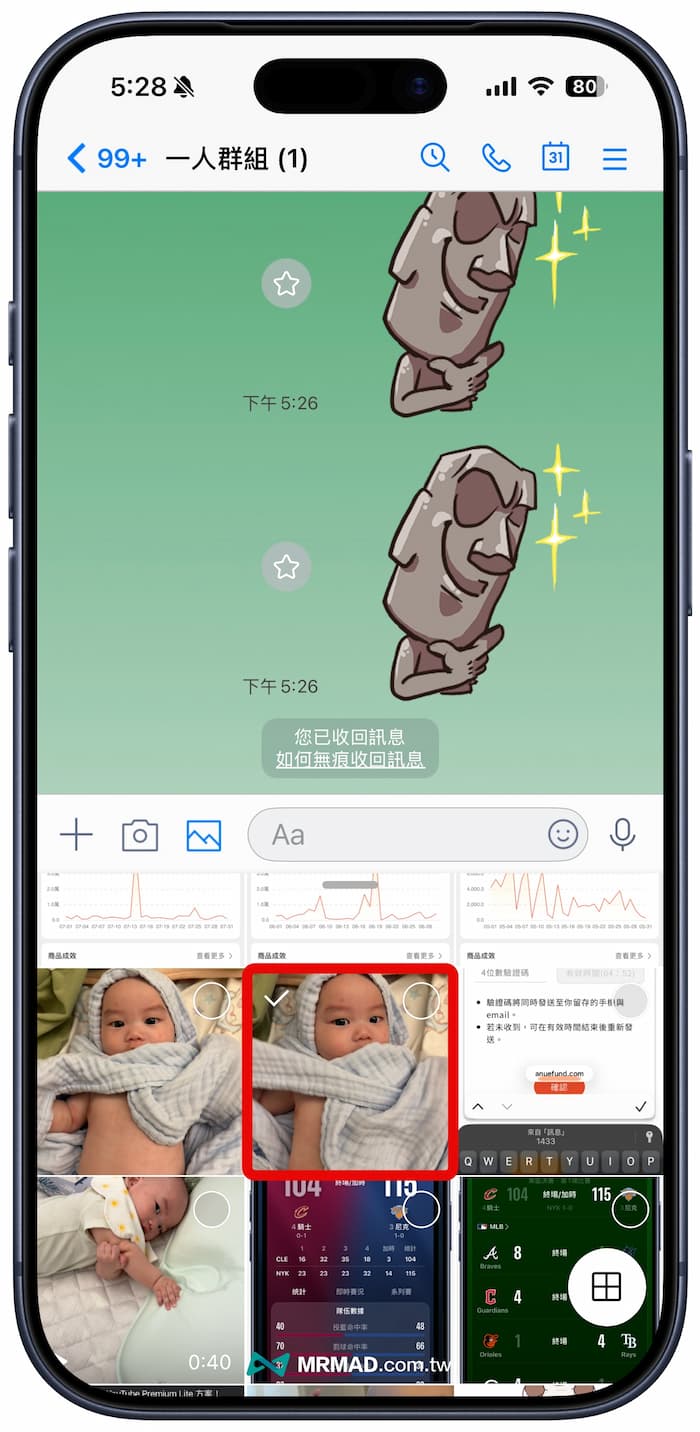
Step 2. Click the “Mosaic” function on the right toolbar.
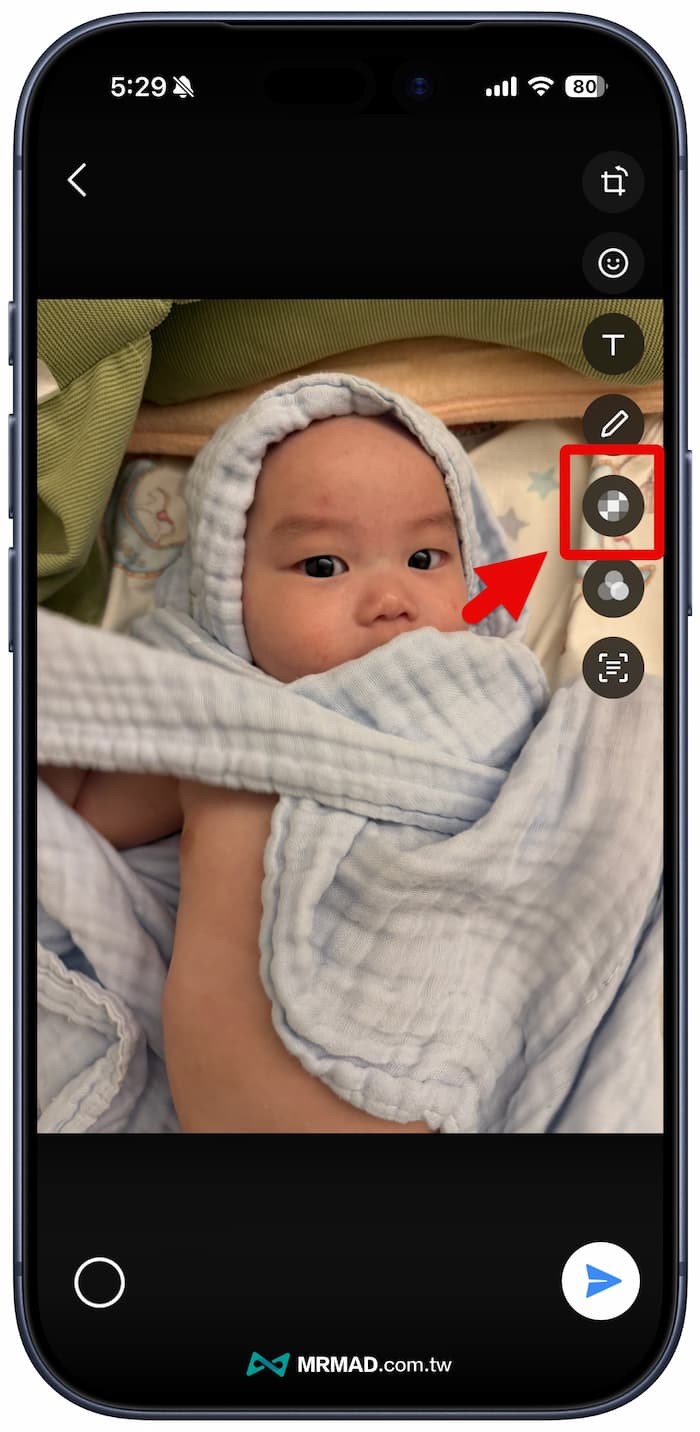
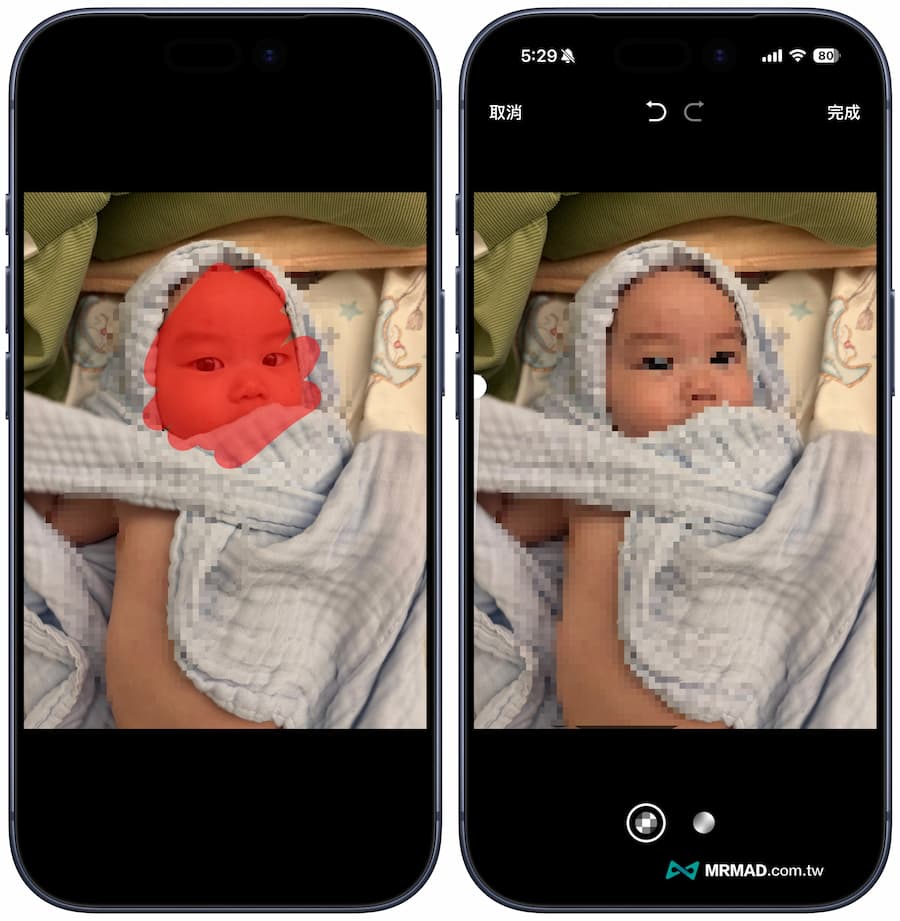
Step 3. The bottom menu will provide two functional effects: “Mosaic” and “Blur”, which can be used to mosaic the iPhone photo. You can also adjust the brush size on the left side. After editing, press “Done” to directly send the mosaic photo.
Method 3 for mosaic iPhone photos: use photo editing APP tools
The third method recommended is to use the super easy-to-use photo mosaic app “My Marks”. You can also easily buy mosaics for photos. It is free and powerful. The operation method is as follows:
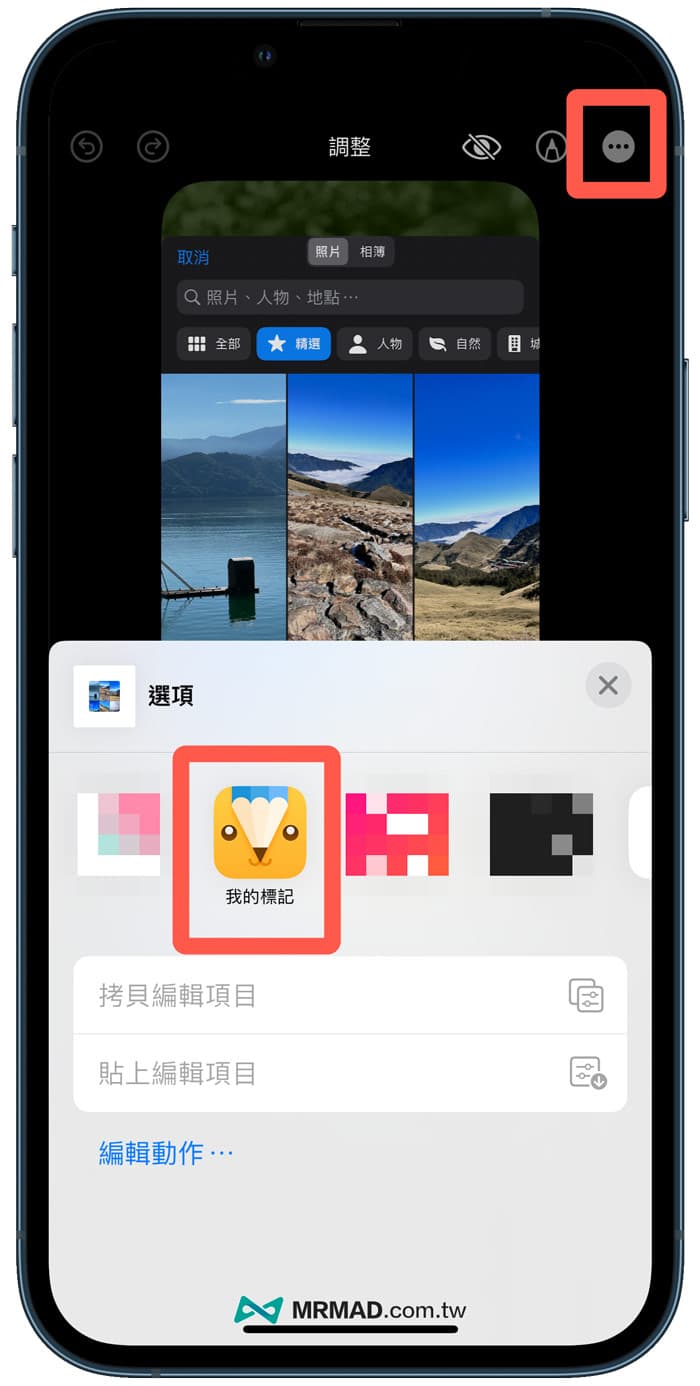
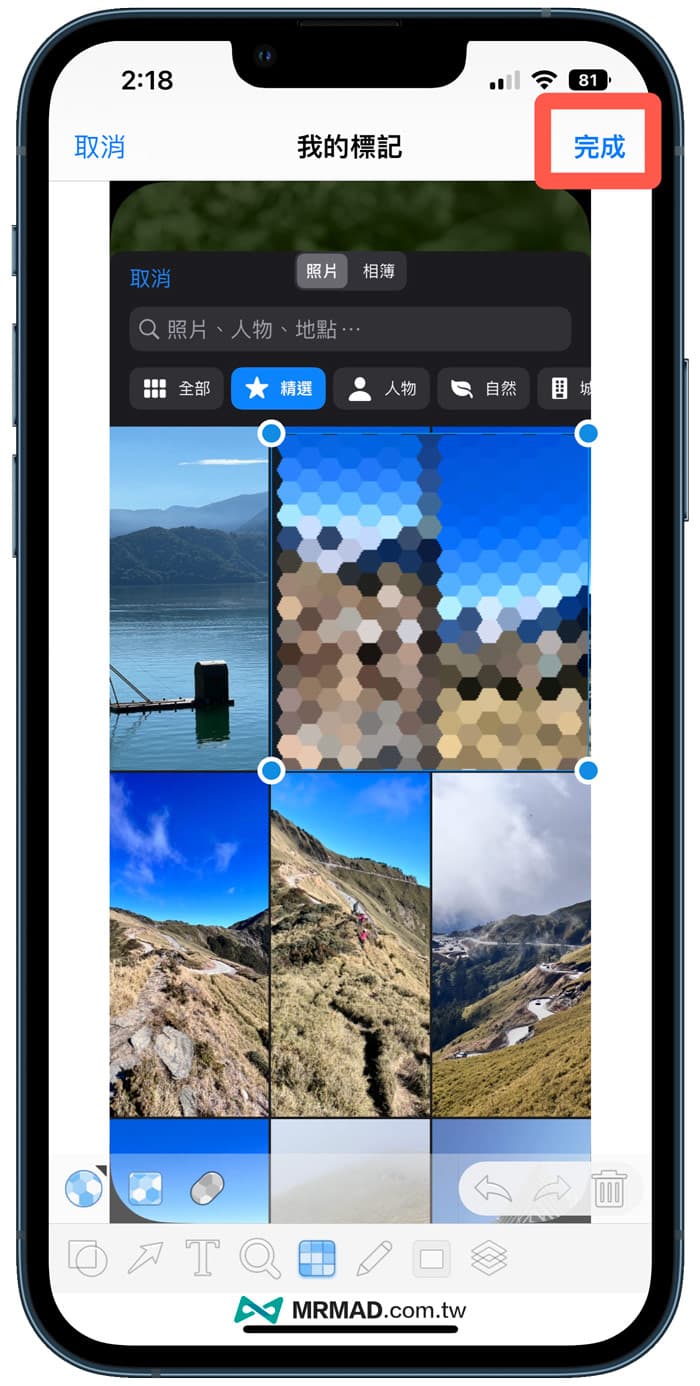
To edit photos from the iPhone’s built-in “Photos App”, click “•••” in the upper right corner to select the “My Marks” app.
Select the “Mosaic” function from the bottom toolbar, which will provide five different mosaic effects, and you can also control the brush size.
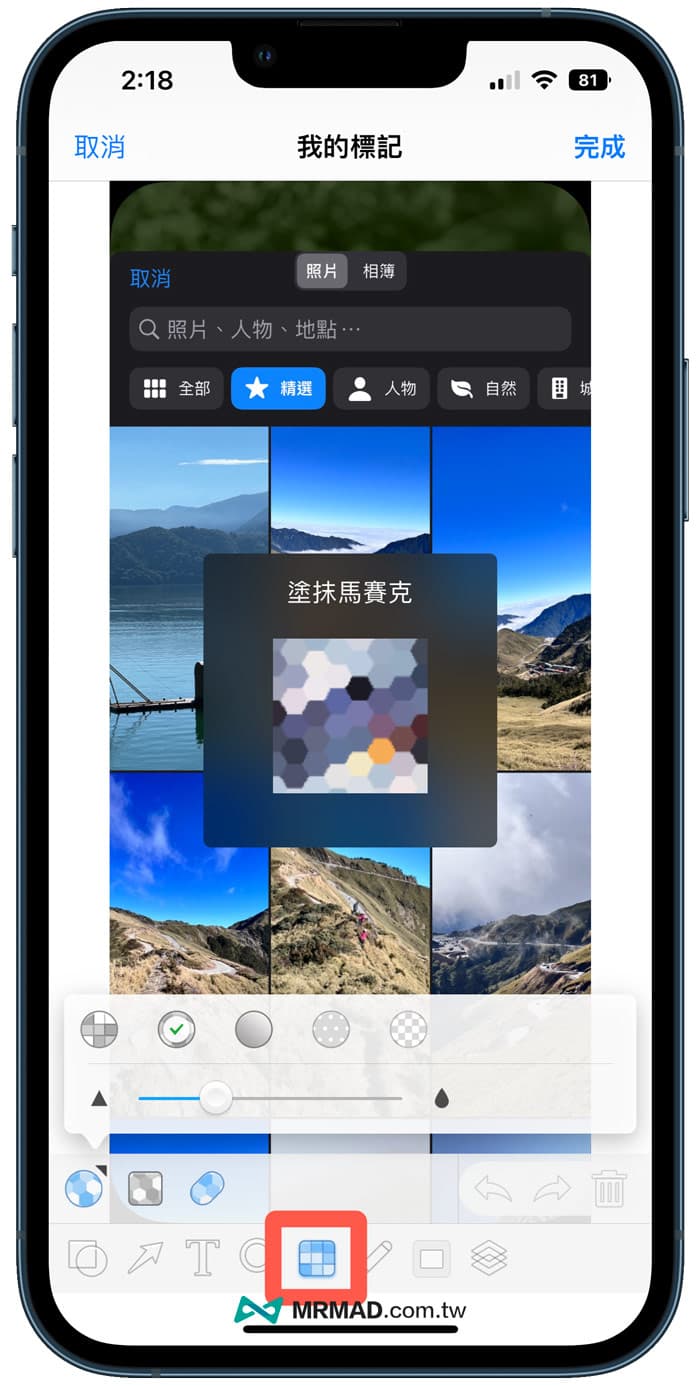
You can easily add the desired mosaic or blur effect to your iPhone photos. After editing, click “Done” in the upper right corner.
Frequently Asked Questions about Mosaic iPhone Photos
Can the original image be restored after coding on iPhone?
If you are editing in the iPhone’s native “Photos” app, Apple uses a non-destructive editing design.
In other words, the original photos will still be retained in the device. As long as you re-enter the editing page and select “Restore”, you can restore them to their original unmodified state.
However, if the image has been exported, sent or uploaded to a social platform, others will usually only receive the edited version, which cannot be restored through the album reply function.
Is it safe to mosaic iPhone photos?
As mobile phone screenshots are shared with the community more and more often, personal information protection has become more important than in the past.
If you just use a black brush to paint, there is still a risk of being restored; using the iPhone’s built-in “solid box” to cover it is currently a safer and simpler method. Especially before sharing bills, addresses, order numbers, identity information or work documents, taking a few seconds to confirm the blocking method can also effectively avoid privacy leakage issues.
If you want to know more Apple information, iPhone teaching and 3C information skills, please follow us
Crazy Mr. FB fan group,
Subscribe to Mr. Crazy Google News,
Telegram,
Instagramas well as
Subscribe to Mr. Crazy YouTube.